Showing posts with label Cayman S. Show all posts

Monday, November 6, 2017

Cayman S: the only car you'll ever need


OK, so I have owned my Cayman S coming up on 7 years now. I can safely say that this is a car that can do almost anything - except haul two more passengers in the back seat.  Other than that, I have used it for long road trips, fishing trips, camping, back road excursions, daily commuting, grocery store runs, auto crossing, Time Trials, and all kinds of track days with the SCCA, NASA, Trackmasters, and Hooked on Driving. In every case and in all uses, this car does everything well. It is the ultimate underdog at the track, yet can embarrass much higher power cars, much more expensive track cars, and just about anything on 4 wheels if the other driver isn't prepared for what is coming in the rear view mirror. Granted, I have modified this car, but that makes it a bit of a "sleeper" that defies expectations.

When I purchased it from a seller back east, he had just had TPC Racing install a full STage4 JRZ race suspension on it, as well as a limited slip differential and a Tubi sports exhaust with a nice ECU tune.  Since then, I have made a few more adjustments to the suspension and tires, along with deep sump and other oiling mods, and I upgraded the brakes to Girodisc rotors, Pagid pads, and Motul fluid. I also had the car color-changed with a full-car vinyl wrap to a green that mimics the green color of the 2007 Porsche GT3RS. Many of these changes have been shown in other posts on my blog. But the biggest change came in 2016 when I had Vision Motorsports completely rebuild the engine. It was bored out from the stock 3.4 liters to 3.8 liters, and a long list of modifications gave it better oiling, higher HP, higher torque, and far more track and daily street dependability. Chrome-moly pistons, new rods, race bearings, underdrive pulley, third radiator, custom crankshaft with oil channels, lightweight aluminum flywheel and racing clutch, etc. With an additional 45 HP and more torque across the band, this car punches above its weight class!

Here are some photos and videos from today as well as through time, commemorating what has been a car with more uses that you can imagine!


Here is a short video of the sound of the car on the street as it accelerates and when blipping the throttle to downshift, and one with some exhaust sound at idle and revs to about 5000 rpm.


And a few videos of the car in action at Sonoma Raceway and Laguna Seca. Some are older, when the car was still in its original black paint, some are newer.

Laguna Seca, 2014. This was before the engine rebuild.


Sonoma Raceway, 2017, after engine rebuild:


And a few more from both tracks:


Thunder hill Raceway, no external microphone:


And this is a full session (older version of car), produced with multiple camera angles by Jay Rosa at VisionWells:


The Gator being used as an SUV, and a pic of before it's color transformation:


Tuesday, March 29, 2016

Porsche Cayman S Brake update: DIY rebuilding Girodisc brake rotors

I'm writing this post because I couldn't find anywhere on the web that had a step-by-step discussion of doing this task...hopefully someone finds this helpful.

A few years ago, I performed an upgrade to the stock brake set-up on my 2007 Porsche Cayman S, utilizing aftermarket rotors from Girodisc and race-oriented pads from Pagid.  I wrote about it in this prior blog post:

brake-upgrade-for-cayman-s


I have been extremely happy with the amazing performance of the brake set-up and also with the longevity of the rotors, which have lasted my several seasons of track days (about 10-12 track days per year). So when the rotors got down to minimum width specs and it was time to replace them, I had no doubt I would again use Girodisc rotors which are slightly larger than the stock rotors, seem to dissipate heat more readily, and don't have cracking problems when used in high-temperature, hard-braking track conditions.

When I went to purchase new rotors, I was pleasantly surprised to realize that Girodisc developed their rotors so that the ring, or disc portion of the rotor can be replaced separately from the "hat" portion which attaches to the axle assembly and ultimately the wheel. What this meant was that instead of purchasing $2200 worth of new rotors ($1100 for each set of two), I could purchase only the ring/discs for $700 for a set of two, for $1400 total. That $800 difference was a nice surprise and represents almost the cost of a new set of tires!  So, I ordered the rings and started taking apart the old brakes to prepare to re-assemble the new ones. That is when I discovered that I couldn't find any online resources that showed me exactly how to complete the job, so I started taking some photos along the way to share with anyone else who might do this.

First steps were to get the car up on jack stands and remove the old brakes, then I set out the new front and rear rotor parts where they need to go (fronts and rear are different sizes and left and right are labeled from the vendor). Note that left and right are different to ensure the proper rotation of the rotor and the cooling grooves cut into the disc. See the Girodisc site for more info on that here:
girodisc.com/Technical-Info

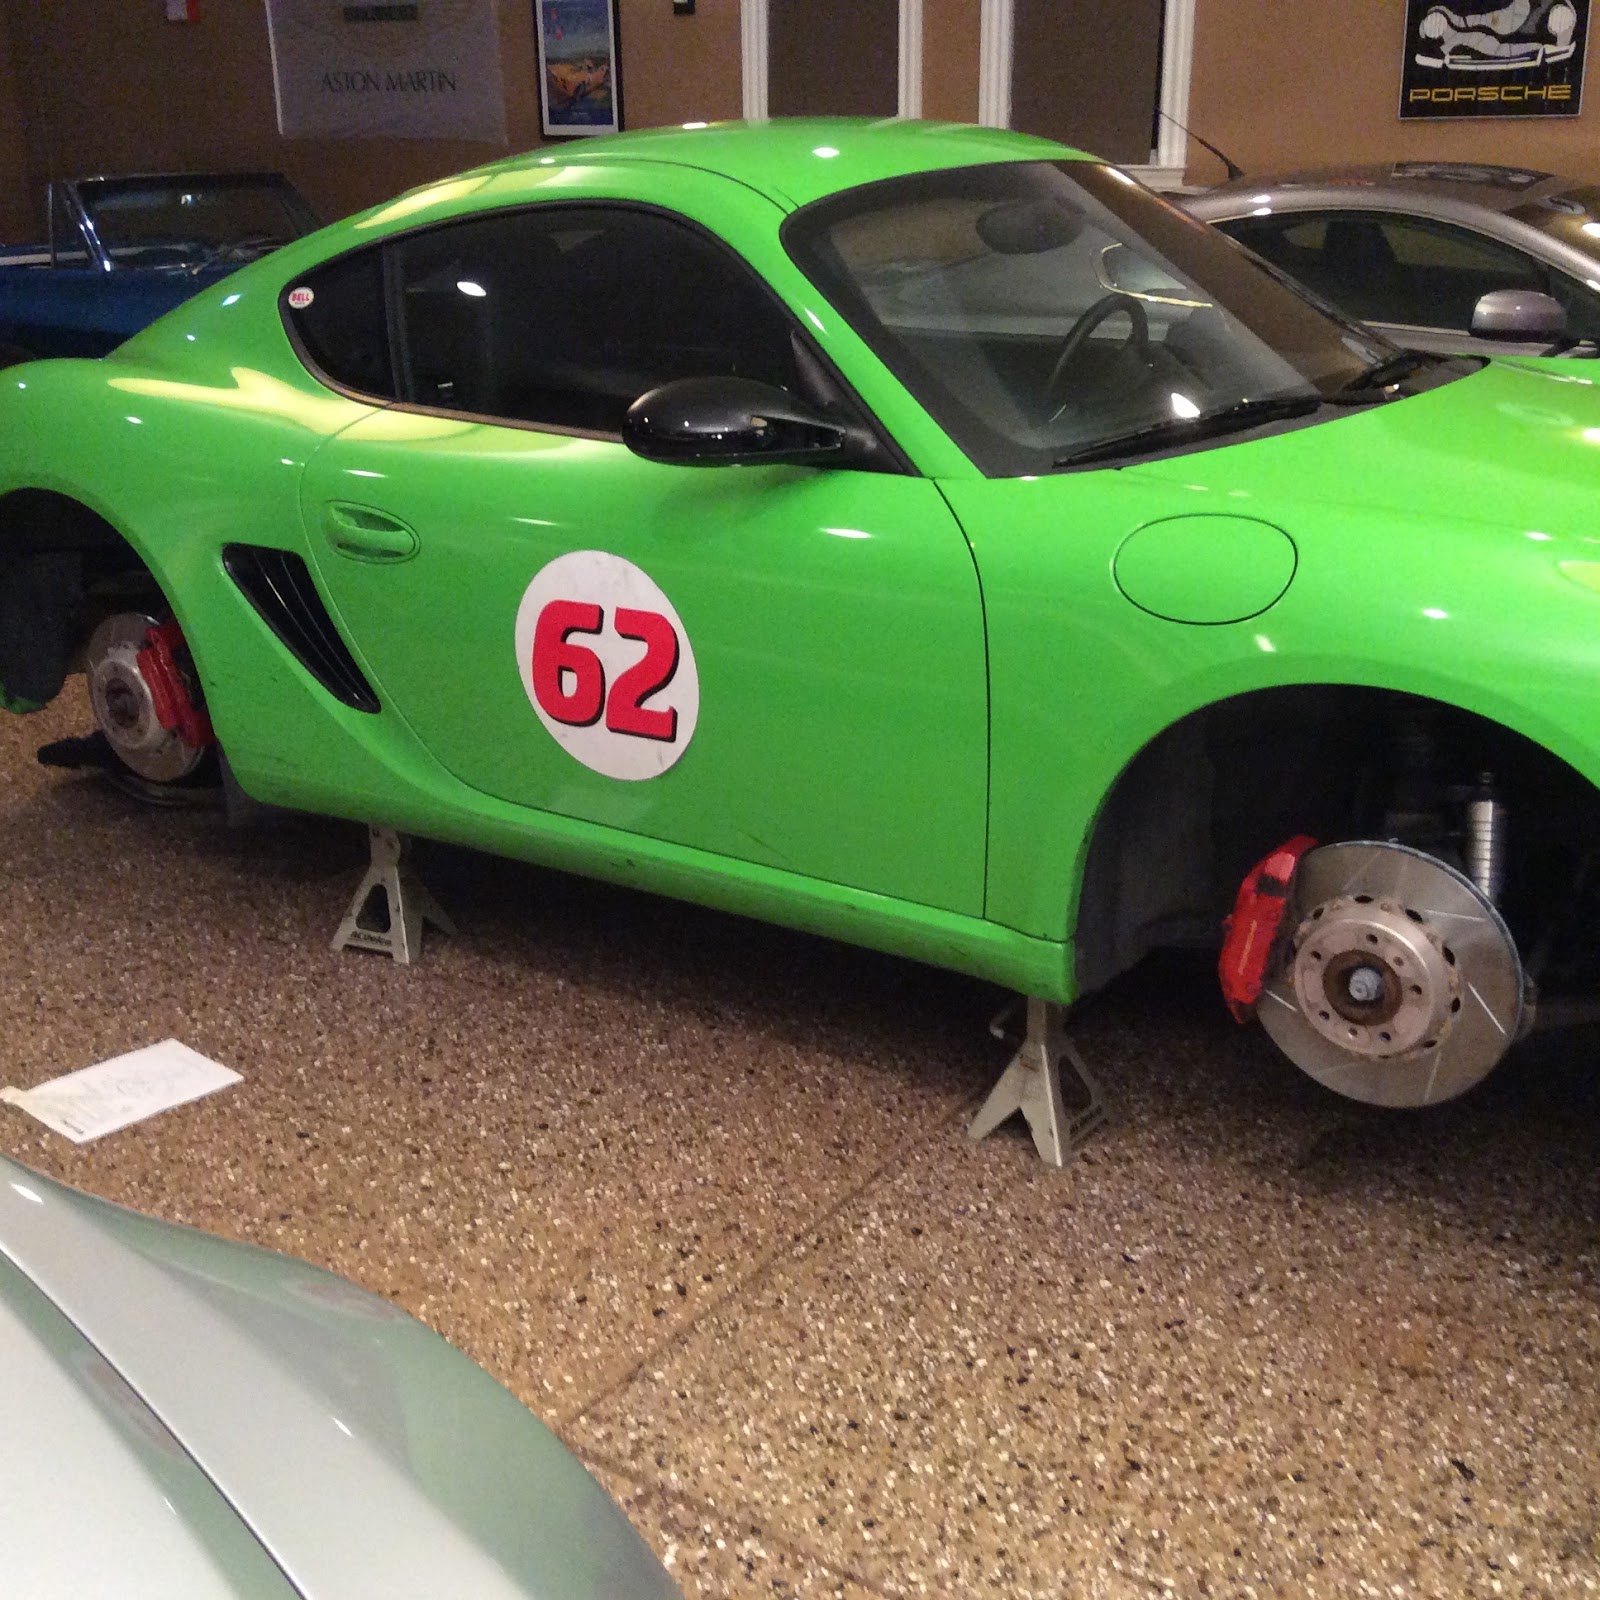
If you have never removed your Cayman brakes, it is pretty simple (at least on the 987 version of the car in 2007). With wheels off, use pliers to remove the cotter pin that holds in the retaining pin in place over the brake pads, then tap the retaining pin out from the holes at the top of the brake pads, releasing them from the small tensioner plate and remove the pads with pliers.  You then remove to large bolts that hold the calipers to the axle using a T55 Torx drive socket. You then remove two small phillips head screws that hold the rotor to the axle and you can pull the rotors fully away from the axle and out of the caliper assembly. There are lots of web posts on this subject so I won't go into it any farther here. I always use some wire to then keep the calipers from dangling on their brake lines while the brakes are disassembled. It'll look something like this:


Now it was time to take the rotor "hats" off the rotor discs. This requires a 5/32 allen head wrench which will also need to be used with a  torque wrench for reassembly, so it is best to just find a ratchet-driven one now for taking it apart.


I started taking them part and found a few things to note.  First, the fronts were much tighter than the rears.  I can only assume this is because the fronts got much hotter during their life on the track and the bolts had gone through more expansion and contraction. I was surprised at how hard it was to get the bolts off the from the hat because I knew the torque settings to reassemble were only 5 ft-lbs (60 inch-pounds).


Once the 10 bolts have been removed from the inside of the hat, the hat should separate from the ring. But on the fronts, again, it didn't come away easily. The heat had them somewhat bonded, but by holding the hat I could smack the disc with a hammer to separate them. The next thing to get out were the drive bushings, which are the threaded "sleeves" that the bolts go into, the heads of which you see on the outside-facing part of the rotor.


Again, the front ones had a harder time coming out, so I used an old screwdriver as a center-punch to get them out. The rear ones came out just with with finger-power.


With the hats now removed, I used a wire brush on a drill to clean up any corrosion, and finished off with some brake-clean to make sure the hats would seat perfectly on the new rings and that the assembly would seat nicely to the axle. The people at Girodisc make sure to tell you that any burrs or inconsistencies on the contact surfaces can lead to vibration or diminished performance. The clean hats were now ready to go onto the new rings.


When I had previously read the specs for assembly, I had realized I needed a smaller torque wrench and could find one only online.  For settings as small as 5 ft-lbs, the wrench is a 1/4" drive.  So since the allen-head socket is a 3/8" drive, I also needed an adapter to allow a 3/8" socket to go on my new 1/4" drive torque wrench. the Girodisc ring set comes with all new hardware, so with shiny new stuff, I was ready to go.

The hardware kit includes 10 bolts and drive bushings for each rotor, with 5 of one type of bolt assembly and 5 of another. You assemble them using these two bolts in an alternating pattern around the hat. One type has an expansion piece/spacer that looks like "shoulders" on the bolt.  This sits against the hat surface and (I assume) allows for some expansion when the brakes get hot.


I first placed the brass-colored drive bushings into the hat, and found that I needed to clean up the inside circumference of the old front hats with a round file, just so the bushing went in smoothly.  Just a few filings and the hat holes were ready to accept the bushings.


I then placed the hat onto the new ring, lining up the bushings into the holes on the ring and then installed the ten bolts in alternating pattern.  I placed a couple drops of high-temperature thread locking fluid on each bolt. I don't have a photo there, because I didn't have three hands and I was holding the rotor assembly vertically.  I then placed the rotor down flat on the bench and torqued the bolts to 60 in-lbs.


With the rotors now each re-assembled, I just reversed the process and re-installed the rotors onto the car. Of course, now you have a slightly thicker rotor disc than the old used one so you may have to push the caliper piston-pots back to a more flat position against the inside of the caliper. I use the handle portion of a large 1/2' ratchet to lay against the inside surface and control slowly how much pressure to apply to make the pistons go back into the caliper. With the rotors back on the car, note the proper orientation of the rotor grooves relative to the direction of the car.


Now the "Gator" is ready to get the wheels back on and get to the track.  Thunderhill Raceway this week, Sonoma raceway two weeks later and Laguna Seca in about a month ! Ya gotta love Northern California track availability!

Good luck with your brake upgrade!!

Thursday, October 15, 2015

Dave's Drives: Cayman S, a couple laps at Sonoma Raceway vs Mustangs


Here is a video from in-car at a recent track day with Trackmasters Racing at Sonoma (Sears Point) Raceway. The Cayman S was running well, and I was doing OK on the lines (only slightly better than the Mustangs I was chase and passing). I think my braking points and turn-ins still need work here.  Can't blame the car, just the driver - but I ran a few 1:56 range laps that weren't bad.  I need to drop another 5 seconds off that time, though.  For some reason, my sound is not synched well in this video...


Tuesday, June 25, 2013

10 Laps at Laguna Seca in Cayman S aka "The Gator"


On May 31, a clear day at Laguna Seca. Event by Trackmasters-Racing.


Unfortunately, I didn't get too many clean laps, as I pretty much overtook some other car on every lap and often had to slow or change lines to get around.  When I did get clean, the car was running great.  New Toyo R888 tires in front felt very stable, while the slightly older ones in back were a tad more slippery, giving me just the right amount of oversteer bias to get the rear-end around and point the car when I wanted to.  I managed to pass quite a few more powerful cars, a testament to great brakes and good lines.

Lap 1 overtake and pass two BMW M3s about 1:46 into lap
Lap 2, overtake and pass Porsche GT3 at about :34 and then the Porsche Turbo at 1:05 when he spins coming out of turn 6 (watch that cloud of dust, because he comes right back across the track!)
Lap 3: overtake and pass a 914-6 in cool Gulf Livery at 1:10 after corkscrew
Lap 5: from Turn 4 at 40 seconds to Corkscrew, make up 100 yards and overtake and pass a 240Z. Cayman brake superiority is evident going into corkscrew (as well as into every Turn 2)
Lap 6: catch the Carrera and Shelby (pass). Again, note brake superiority into Corkscrew is what beats the Shelby.
Lap 8 : Pass instructor in Miata going into turn 6…that was hairy!
Lap 10: catch and pass Carrera, FRS, Nissan GTR, and an Evo.

Monday, April 30, 2012

Brake upgrade for the Cayman S

After almost a year of tracking the Cayman, I had never really had an issue with "brake fade". But last time out, I finally got to experience what I had always heard about. I was about 25 minutes into a track session at Laguna Seca with Trackmasters (www.trackmasters-racing.com), I was heading into Turn 2 (Andretti hairpin), doing about 118 mph. I hit the brakes hard, but the pedal went soft on me and I went in too fast, went waaaaaay wide, and was happy there were no other cars in the turn with me.

For those who aren't into this stuff, a quick lesson on brakes and fluid: When your brakes get really hot, they can transfer that heat to the brake fluid. Brake fluid is hydrostatic, which means it tends to attract atmospheric water over time. When water is in your brake fluid, and then gets hot, it vaporizes and puts air in your fluid. Next time you press your brake pedal, instead of having that force transferred to the calipers, causing your brake pads to squeeze your brake rotors, the pressure merely serves to compress the air that is now in your lines (air compresses, brake fluid doesn't). That is when your pedal gets mushy, or in the worst case, just presses right to the floor and NO BRAKES! Not good at high speeds.

In racing, brakes do a great deal of work, and get very hot in short period of time. To combat the heat, you can: (a) have larger equipment to dissipate heat better, (b) use materials that are less likely to heat up, (c) have brake fluid that attracts less water and/or holds up to heat better or (d) direct more air to the brakes to cool them. I decided to do (e) all the above, if only because I am a wuss and never want to be without brakes at high speed again. The other key is to replace brake fluid often, to flush out any accumulated water.

So, if you drive a Cayman S, I can say this is an easy upgrade, only takes a couple hours to complete, and works great. Here is what I got:

Larger diameter Girodisk rotors
Pagid RS29 "Yellow" racing brake pads
Motul 600 Brake fluid
GT3 brake air-flow ducts (not shown)
Tools required: Torx 55 Bit (1/2" ratchet), torque wrench, brake bleeder, lug wrench, needle nose piers, hammer.

Here is everything you need for a fun day upgrading your Cayman S brakes:


The Girodisc people provide the spacers and longer caliper bolts to account for the larger diameter rotor:

Note the small cracks on the old(stock) rotors that were developing due to heat stress. No bueno…

Installed at each corner in about 20 minutes. Brake are pads held in by a cotter pin, a rod pin and tensioner. Caliper is held on by two bolts, and the rotor is attached with two small screws (and the wheel once it is bolted back onto the axle hub):
Finished look:

The brakes work great, and stop the car so hard that they are too much for stock tires (inducing lock-up). I look forward to putting the track tires back on to test the real stopping power of these babies!

This article discusses the process for removing and replacing the brake pads:

and this article discusses the replacement of the rotors:

Wednesday, November 9, 2011